Developing Tribefire Artifacts
Having created and built our artifacts, it's time to develop them!
Developing Artifacts
Setting up Workspace
-
Open Eclipse. Let's set Project Presentation to Hierarchical:

-
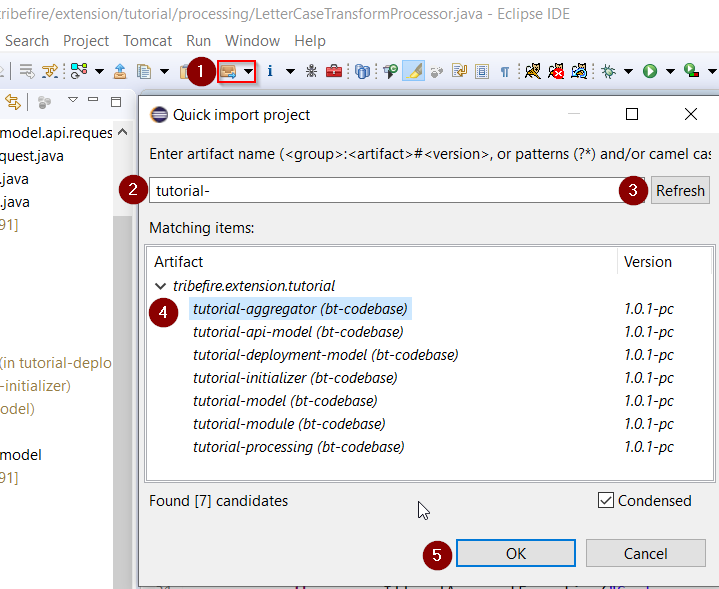
Now we can import our artifacts. Use the Quick Import feature as shown below (the list is empty until you type something and refresh):
-
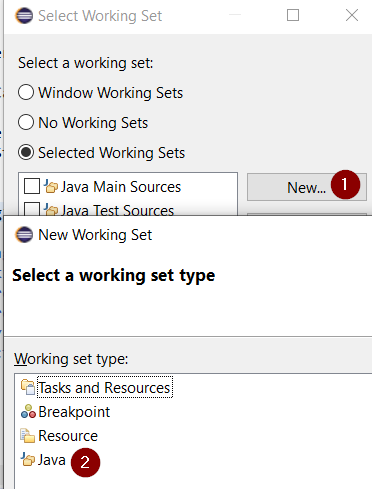
Now, we will need a working set for our artifacts. This is optional depending on your preferences, however this setup should be helpful when developing Tribefire artifacts. First, open the Select Working Set... menu:

Select Java as working set type:
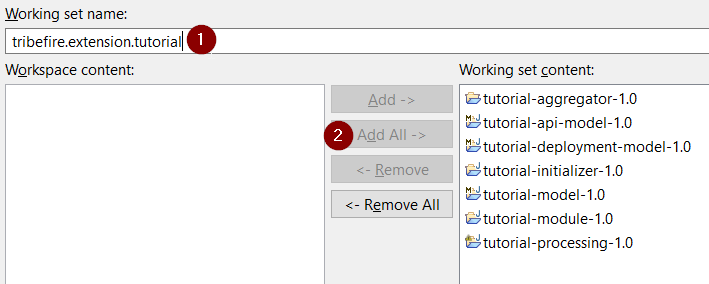
When prompted, add all artifacts to working set content:
-
Your workspace should now contain a working set with all artifacts. You can now synchronize it:
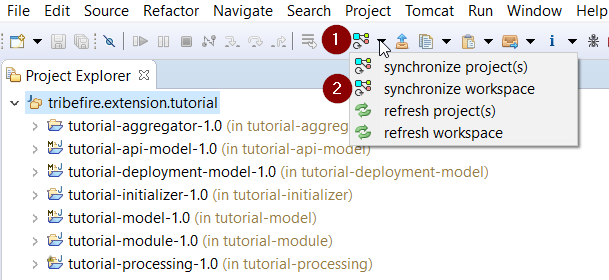
Synchronize action is part of the DevRock suite. It means that AC reads the
pom.xmlfiles (in selected projects or the entire workspace, depending on your choice) and traverses the full dependency tree. Once the solutions are determined, a refresh is made (existing set of solutions is used and correlated with projects that already exist in the workspace). Every sync will run twice; once for the compile-time classpath and once for the runtime classpath - the compile job will trigger the launch job as the last action before it terminates. As soon as the compile-time classpath is ready, Eclipse will get an update and will be able to check the compile-time state of the project. As soon as the launch classpath is ready, you can launch the project from within Eclipse.
Developing the Deployment Model
We're going to start our development with the tutorial-deployment-model artifact. This model, following Tribefire convention set for all deployment models, contains denotation types - abstract representations of Tribefire functionality (interfaces without the logic). In our case, these are our Web Terminal and Service Processor. We will later use Wire to bind our denotation types to the processing logic.
-
First, let's make sure that our model has the correct dependencies. Open the
pom.xmlfile and add the following dependencies:<dependencies> <dependency> <!--Contains the WebTerminal entity.--> <groupId>tribefire.cortex</groupId> <artifactId>extension-deployment-model</artifactId> <version>${V.tribefire.cortex}</version> <?tag asset?> </dependency> <dependency> <!--Contains the ServiceProcessor entity.--> <groupId>tribefire.cortex</groupId> <artifactId>service-deployment-model</artifactId> <version>${V.tribefire.cortex}</version> <?tag asset?> </dependency> </dependencies>When you have added the dependencies (i.e. saved the pom.xml with your changes), your workspace should synchronize automatically.
-
Initially, our tutorial-deployment-model looks as follows:

The default package name is
groupId.model, in this casetribefire.extension.tutorial.model. Let's change it totribefire.extension.tutorial.model.deploymentto follow Braintribe conventions. -
Now, we can define the model's components. Let's add the following interfaces to the
tribefire.extension.tutorial.model.deploymentpackage: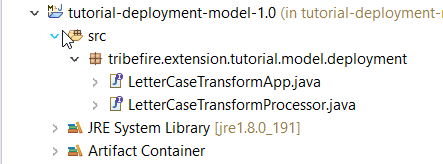
- LetterCaseTransformApp - this is our Web Terminal. It has to extend WebTerminal - the basic interface for all Tribefire Web Terminals.
- LetterCaseTransformProcessor - this is our Service Processor. It has to extend ServiceProcessor - again, this is the basic interface for all Service Processors.
-
Every entity in Tribefire (more about entities here) has a static field T, which is known as the type literal. Essentially,
Person.Treturns an object which represents the Person entity. Type literals are necessary in all custom entities such as our interfaces, thus we need to enter the T literal in both interfaces so that the correct entity is returned. Add the literals as shown below:-
T Literal in LetterCaseTransformApp:
EntityType<LetterCaseTransformApp> T = EntityTypes.T(LetterCaseTransformApp.class); -
T Literal in LetterCaseTransformProcessor:
EntityType<LetterCaseTransformProcessor> T = EntityTypes.T(LetterCaseTransformProcessor.class);
Having declared the literals, we are done with the deployment model! Both interfaces should now have the correct extension and the T literal, as shown below:
package tribefire.extension.tutorial.model.deployment;

import com.braintribe.model.extensiondeployment.ServiceProcessor;
import com.braintribe.model.generic.reflection.EntityType;
import com.braintribe.model.generic.reflection.EntityTypes;

public interface LetterCaseTransformProcessor extends ServiceProcessor {

	EntityType<LetterCaseTransformProcessor> T = EntityTypes.T(LetterCaseTransformProcessor.class);

}
Synchronize your workspace and move on to creating the API model!
-
Developing API Model
tutorial-api-model is where we define the service request (our expert that will later be wired with the interfaces in deployment model) used to transform the letter size from lowercase to UPPERCASE. Since the request needs to work both ways (lower-to-upper and upper-to-lower), we're going to make it abstract and extend specific requests from it. In case a processor handles more than one request, we always need an abstract request bundling the concrete ones. The abstract request is then used as the binder for the processor implementation.
tutorial-api-model is what we call a skeleton model - because it declares its own entity type. For our use-case, we're going to instantiate a configured model later on.
-
First, we need to make sure that the artifact has the correct dependency. Open the
pom.xmlfile and add the following dependencies:<dependencies> <dependency> <!--Contains the ServiceProcessor entity.--> <groupId>com.braintribe.gm</groupId> <artifactId>service-api-model</artifactId> <version>${V.com.braintribe.gm}</version> <?tag asset?> </dependency> </dependencies> -
The default package name is
groupId.model, in this casetribefire.extension.tutorial.model. Let's change it totribefire.extension.tutorial.model.api.requestto follow conventions. -
Time to add our service requests. Create the following interfaces in the API model:
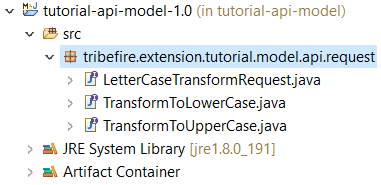
- LetterCaseTransformRequest extending AuthorizedRequest - this is our abstract request.
- TransformToLowerCase extending LetterCaseTransformRequest - this is the request handling transformation to lowercase.
- TransformToUpperCase extending LetterCaseTransformRequest - this is the request handling transformation to uppercase.
-
Define T literals in every interface. This is the literal for LetterCaseTransformRequest - add it and follow the pattern for other requests:
EntityType<LetterCaseTransformRequest> T = EntityTypes.T(LetterCaseTransformRequest.class);Having defined the literals, you're done with TransformToLowerCase and TransformToUpperCase. We will use those interfaces in our service processor later on.
-
Since both of our requests take a sentence as input and both return a string, we can put the sentence property as well as the eval method (response) to the abstract base type LetterCaseTransformRequest:
package tribefire.extension.tutorial.model.api.request;

import com.braintribe.model.generic.annotation.Abstract;
import com.braintribe.model.generic.eval.EvalContext;
import com.braintribe.model.generic.eval.Evaluator;
import com.braintribe.model.generic.reflection.EntityType;
import com.braintribe.model.generic.reflection.EntityTypes;
import com.braintribe.model.service.api.AuthorizedRequest;
import com.braintribe.model.service.api.ServiceRequest;

@Abstract
public interface LetterCaseTransformRequest extends AuthorizedRequest {

	EntityType<LetterCaseTransformRequest> T = EntityTypes.T(LetterCaseTransformRequest.class);

	String getSentence();
	void setSentence(String sentence);

	@Override
	EvalContext<String> eval(Evaluator<ServiceRequest> evaluator);
Note: On interface level, we ALWAYS model our variables as getter- and setter-methods!
-
Having created our requests, we can proceed to developing the processing logic in the processing model!
Creating Processing Model
Processing model is where we write our service processor, which is where the processing logic is coded.
Our service processor takes a service request as input. Since our service request is abstract, binding two actual requests, we need to map the request to the proper implementation (dispatch it). This is why we're going to extend a AbstractDispatchingServiceProcessor, where the proper method is already implemented.
-
Make sure that our model has the proper dependencies. Open
pom.xmland add the following dependencies (one of them is our API model - our processor will need the get- and set methods implemented there):<dependencies> <dependency> <groupId>com.braintribe.gm</groupId> <artifactId>service-api</artifactId> <version>${V.com.braintribe.gm}</version> </dependency> <dependency> <groupId>tribefire.extension.tutorial</groupId> <artifactId>tutorial-api-model</artifactId> <version>${V.tribefire.extension.tutorial}</version> </dependency> </dependencies> -
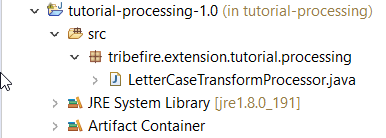
Adapt the package name. Since this is a processing model, the package should be called
tribefire.extension.tutorial.processing. -
Create a public class called LetterCaseTransformProcessor:
Extend it from AbstractDispatchingServiceProcessor, entering LetterCaseServiceRequest as the request and Object (why?) as the response.
public class LetterCaseTransformProcessor extends AbstractDispatchingServiceProcessor<LetterCaseTransformRequest, Object> { -
Implement the transformation logic. We're going to use the toLowerCase and toUpperCase methods, provided by Java's
Java.lang.Stringlibrary. We will get our input using thegetSentence()method defined in our abstract LetterCaseTransformRequest interface:private String transformToLowerCase(ServiceRequestContext context, TransformToLowerCase request) { //check if the incoming sentence is not null or empty - throw illegalArgumentException in such case //Otherwise return the lower-case sentence String sentence = request.getSentence(); if(CommonTools.isEmpty(sentence)) { throw new IllegalArgumentException("Sentence must not be null or empty!"); } return sentence.toLowerCase(); } private String transformToUpperCase(ServiceRequestContext context, TransformToUpperCase request) { //check if the incoming sentence is not null or empty - throw illegalArgumentException in such case //Otherwise return the lower-case sentence String sentence = request.getSentence(); if(CommonTools.isEmpty(sentence)) { throw new IllegalArgumentException("Sentence must not be null or empty!"); } return sentence.toUpperCase(); } -
Override the configureDispatching method (remember that our request is abstract!) to map the request to the proper method (which we will implement in the next step):
@Override protected void configureDispatching(DispatchConfiguration<LetterCaseTransformRequest, Object> dispatching) { //Preparing internal logic. Depending on which request is incoming, execute the proper method (maps the request to //its implementation) dispatching.register(TransformToLowerCase.T, this::transformToLowerCase); dispatching.register(TransformToUpperCase.T, this::transformToUpperCase); } -
You're done implementing the processing expert logic! Now that you have both the expert logic as well as the denotation type, it's time to wire them. This is done in the tutorial-module artifact, as explained in the next section.
Creating Tutorial Module
Tutorial module is where we wire the denotation types - our Processor and App interfaces in the deployment model - to their experts (the actual processor/app implementations in the processing artifact).
Wiring the LetterCaseTransformProcessor
First, we're going to wire the LetterCaseTransformProcessor denotation type (interface from the deployment model) to the instance of LetterCaseTransformProcessor expert (logic in the processing artifact).
- Rename the existing classes in tutorial.extension.module.wire.space package to TutorialDeployablesSpace and TutorialModuleSpace to avoid confusion with other similar Module artifacts.
- In order to have an expert to wire, we need to define the processor object in TutorialDeployablesSpace. Remembering that it is the
LetterCaseTransformProcessorclass from the tutorial-initializer artifact that hosts the processing logic, we define the object as follows:
@Managed
public class TutorialDeployablesSpace implements WireSpace {

	@Managed
	public LetterCaseTransformProcessor letterCaseTransformProcessor() {
		return new LetterCaseTransformProcessor();
	}

}
The instance of this object is going to be our expert which we are now going to wire to the denotation type (our LetterCaseTransformProcessor interface from the deployment model).
-
Open TutorialModuleSpace and connect (bind) the previously created
letterCaseTransformProcessorexpert to its denotation type, which is the LetterCaseTransformProcessor interface.-
First, we need to import and instantiate TutorialDeployablesSpace created previously:
@Import
private TutorialDeployablesSpace deployables;
We're going to point to our
letterCaseTransformProcessorvia deployables (note that we have just one expert inside at the moment, but in real life there will be more). -
We also need to import TribefirePlatformContract, which provides all available Platform contracts, including the
binders()contract we will need:@Import private TribefirePlatformContract tfPlatform; -
Now we can override the
bindDeployablesmethod provided by TribefireModuleContract. Together with thebinders()contract from TribefirePlatformContract, we wire the expert to the denotation type as follows:@Override public void bindDeployables(DenotationBindingBuilder bindings) { // Bind deployment experts for deployable denotation types. // Note that the basic component binders (for e.g. serviceProcessor or incrementalAccess) can be found via tfPlatform.deployment().binders(). bindings.bind(LetterCaseTransformProcessor.T) .component(tfPlatform.binders().serviceProcessor()) .expertSupplier(deployables::letterCaseTransformProcessor);As a result, the whole class looks as follows (without the imports):
@Managed
public class TutorialModuleSpace implements TribefireModuleContract {

    @Import
    private TribefirePlatformContract tfPlatform;

    @Import
    private TutorialDeployablesSpace deployables;
    //
    // Deployables
    //

    @Override
    public void bindDeployables(DenotationBindingBuilder bindings) {
        // Bind deployment experts for deployable denotation types.
        // Note that the basic component binders (for e.g. serviceProcessor or incrementalAccess) can be found via tfPlatform.deployment().binders().
        bindings.bind(LetterCaseTransformProcessor.T)
        .component(tfPlatform.binders().serviceProcessor())
        .expertSupplier(deployables::letterCaseTransformProcessor);

    }

}
-
Having wired the experts to the denotation types, we can proceed to develop our initializer!
Creating the Initializer
When Tribefire starts, we want it to be initialized with certain components so that we can use the logic we developed previously right away. Otherwise, we would have to configure these components from within the running platform. We will initialize Tribefire with a configured API model. The model itself will be initialized with ProcessWith metadata, providing our LetterCaseTransformProcessor as an expert to be used when a request comes in.
- tutorial-api-model - we need a configured instance of it so that we can execute REST service requests on our platform when it is running. Configured API model must be initialized as a dependency to tribefire's cortex service model.
- ProcessWith metadata needs to be initialized on our API model so that it uses the processing logic we defined previously. This metadata is part of Tribefire - we will only use it, not define it.
Renaming the Files
Files from your initializer artifact, when published to a shared repository, could easily be confused with similar files from another initializer artifact. This is why we need to rename these files to clearly indicate their origin and purpose.
-
Open
tribefire.extension.tutorial.initializer.wire.contractpackage and remove the RuntimePropertiesContract - we will not use it in this tutorial. -
In all packages, rename the remaining files so that they have the
Tutorialprefix, to avoid confusion with similar files inside other initializer artifacts (keep in mind that everyone is using Jinni to build artifacts, so everyone gets the same default names!). Do it on all of the following files:- InitializerSpace -> TutorialInitializerSpace
- InitializerMainSpace -> TutorialInitializerMainSpace
- InitializerModelsSpace -> follow the pattern
- InitializerContract
- InitializerMainContract
- InitializerModelsContract
- InitializerWireModule
- Initializer
Setting up Contracts
As a convention, initializer uses a system of contracts to refer to items being initialized (configured API model with ProcessWith metadata in our case). Go ahead and set up the contracts as described below:
-
Open
tribefire.extension.tutorial.initializer.wire.contractpackage. -
Open the TutorialInitializerModelsContract and add a new model to it. Let's call it configuredTutorialApiModel (we have not yet defined it, but we will later):
public interface TutorialInitializerModelsContract extends WireSpace {

    GmMetaModel configuredTutorialApiModel();
}
This is the model that we will later add to the cortex service model in the main initializer.
-
In the same package, open TutorialInitializerContract and add the
ProcessWithmetadata to it (again, we will define the metadata later):public interface TutorialInitializerContract extends WireSpace { ProcessWith processWithLetterCaseTransform(); } -
In ExistingInstancesContract, we're going to refer to instances getting created by Tribefire on runtime (this is why we call them existing instances) via the
GlobalIdannotation. We know the conventions Tribefire follows when assigningGlobalIdto both modules and models, and we're going to use that knowledge now to refer to existing instances of tutorial-module and tutorial-api-model.
add the following String constants and GlobalId annotations:
```java
@InstanceLookup(lookupOnly=true)
public interface ExistingInstancesContract extends WireSpace {

    String GROUP_ID = "tribefire.extension.tutorial";
    String GLOBAL_ID_PREFIX = "model:" + GROUP_ID + ":";

    @GlobalId("module://" + GROUP_ID + ":tutorial-module")
    Module tutorialModule();

    @GlobalId(GLOBAL_ID_PREFIX + "tutorial-api-model")
    GmMetaModel tutorialApiModel();

    // TODO
}
```

We have now defined how the `GlobalId` (mandatory property present in every tribefire entity) is initialized on the module and API model.
-
Finally, open TutorialInitializerMainContract. We need our previously defined contracts as well as the CoreInstancesContract (which bring the cortex service model) in the main contract (you can remove other contracts if present):
public interface TutorialInitializerMainContract extends WireSpace {

	TutorialInitializerContract initializer();

	ExistingInstancesContract existingInstances();

	CoreInstancesContract coreInstances();

	TutorialInitializerModelsContract models();

}
We're going to refer to our contracts in the initializer through the main contract.
You're done working with the contracts now!
Setting up Initializer Wire Spaces
We need to define how our configured API model and ProcessWith metadata should be initialized, which is done in the wire spaces.
TutorialInitializerSpace
We define metadata initialization in this initialized wire space.
-
Open
tribefire.extension.tutorial.initializer.wire.contractpackage. -
Open TutorialInitializerSpace. Implement TutorialInitializerContract:
@Managed public class TutorialInitializerSpace extends AbstractInitializerSpace implements TutorialInitializerContract -
Add the following contract:
@Import
	private ExistingInstancesContract existingInstances;
We will need
existingInstancesto refer to our tutorial-module instance. -
Now, we will define how our service processor should be instantiated. First, we create an instance, then we assign the Name, ExternalId, and our tutorialModule.
@Managed
	private LetterCaseTransformProcessor letterCaseTransformProcessor() {
		LetterCaseTransformProcessor bean = create(LetterCaseTransformProcessor.T);

		bean.setName("Letter Case Transform Processor");
		bean.setExternalId("serviceProcessor.letterCaseTransform");
		bean.setModule(existingInstances.tutorialModule());
		return bean;
	}
We are now able to instantiate the ProcessWith metadata with the above service processor.
-
Finally, we define how the ProcessWith metadata should be instantiated. We will call it
processWithLetterCaseTransformto clearly indicate what we're using it for. Then, we assign theletterCaseTransformProcessorwith thesetProcessormethod to our entity.@Override @Managed public ProcessWith processWithLetterCaseTransform() { ProcessWith bean = create(ProcessWith.T); bean.setProcessor(letterCaseTransformProcessor()); return bean; } -
Your TutorialInitializerSpace should now look as follows:
@Managed
public class TutorialInitializerSpace extends AbstractInitializerSpace implements TutorialInitializerContract {

    @Import
    private ExistingInstancesContract existingInstances;

    @Override
    @Managed
    public ProcessWith processWithLetterCaseTransform() {
        ProcessWith bean = create(ProcessWith.T);

        bean.setProcessor(letterCaseTransformProcessor());

        return bean;
    }

    @Managed
    private LetterCaseTransformProcessor letterCaseTransformProcessor() {
        LetterCaseTransformProcessor bean = create(LetterCaseTransformProcessor.T);

        bean.setName("Letter Case Transform Processor");
        bean.setExternalId("serviceProcessor.letterCaseTransform");
        bean.setModule(existingInstances.tutorialModule());
        return bean;
    }

}
Having finished coding the metadata initialization, we can now proceed to developing TutorialInitializerModelsSpace, where we define how the models are initialized.
TutorialInitializerModelsSpace
Now, we define how our configured API model should be instantiated. This model will be added as dependency to the skeleton API model and we will send our requests to it.
-
Open TutorialInitializerModelsSpace and implement TutorialInitializerModelsContract.
@Managed public class TutorialInitializerModelsSpace extends AbstractInitializerSpace implements TutorialInitializerModelsContract { -
Import the ExistingInstancesContract:
@Import private ExistingInstancesContract existingInstances; -
Create an instance of the configuredTutorialApiModel, set a name on your instance, and add tutorialApiModel as a dependency.
@Override
	@Managed
	public GmMetaModel configuredTutorialApiModel() {
		GmMetaModel bean = create(GmMetaModel.T);

		bean.setName(ExistingInstancesContract.GROUP_ID + ":configured-tutorial-api-model");
		bean.getDependencies().add(existingInstances.tutorialApiModel());

		return bean;
	}
	}
Your initializer models space should now look as follows:
@Managed
public class TutorialInitializerModelsSpace extends AbstractInitializerSpace implements TutorialInitializerModelsContract {

    @Import
    private ExistingInstancesContract existingInstances;

    @Import
    private CoreInstancesContract coreInstances;

    @Override
    @Managed
    public GmMetaModel configuredTutorialApiModel() {
        GmMetaModel bean = create(GmMetaModel.T);

        bean.setName(ExistingInstancesContract.GROUP_ID + ":configured-tutorial-api-model");
        bean.getDependencies().add(existingInstances.tutorialApiModel());

        return bean;
    }

	}
TutorialInitializerMainSpace
Finally, we need to implement TutorialInitializerMainContract in the main space and add unimplemented methods.
-
Open TutorialInitializerMainSpace and implement TutorialInitializerMainContract.
@Managed
public class TutorialInitializerMainSpace implements TutorialInitializerMainContract {
    @Import
    private TutorialInitializerContract initializer;

    @Import
    private ExistingInstancesContract existingInstances;

    @Import
    private CoreInstancesContract coreInstances;

    @Import
    private TutorialInitializerModelsContract models;

    @Override
    public TutorialInitializerContract initializer() {
        return initializer;
    }

    @Override
    public ExistingInstancesContract existingInstances() {
        return existingInstances;
    }

    @Override
    public CoreInstancesContract coreInstances() {
        return coreInstances;
    }

    @Override
    public TutorialInitializerModelsContract models() {
        return models;
    }
	}
Setting up Main Initializer
Finally, having set up all of the above components, we are now ready to develop our initializer.
-
Open TutorialInitializer. Pass TutorialInitializerMainContract to AbstractInitializer.
public class TutorialInitializer extends AbstractInitializer<TutorialInitializerMainContract> -
Override the getInitializerWireModule method:
@Override public WireTerminalModule<TutorialInitializerMainContract> getInitializerWireModule() { return TutorialInitializerWireModule.INSTANCE; } -
We're going to add a method in our initializer that adds processWithLetterCaseTransform metadata to our configuredTutorialApiModel. To that end, we're going create a method to do the following:
- Instantiate the contracts that contain our model (TutorialInitializerModelsContract) and metadata (TutorialInitializerContract).
- Instantiate the metadata editor for configuredTutorialApiModel.
- Use the editor to add processWithLetterCaseTransform metadata on LetterCaseTransformRequest entity.
The full method should look as follows:
private void addMetaDataToModels(TutorialInitializerMainContract initializerMainContract) { TutorialInitializerModelsContract models = initializerMainContract.models(); TutorialInitializerContract initializer = initializerMainContract.initializer(); ModelMetaDataEditor editor = new BasicModelMetaDataEditor(models.configuredTutorialApiModel()); editor.onEntityType(LetterCaseTransformRequest.T).addMetaData(initializer.processWithLetterCaseTransform()); } -
Now, we are prepared to implement the main initialize method. We need to do the following to initialize Tribefire properly:
- Instantiate CoreInstancesContract (which provides the cortex service model methods).
- Instantiate TutorialInitializerModelsContract (which provides our configured API model).
- Assign our configured API model as a dependency to the cortex service model.
- Add processWithLettercaseTransform metadata to our model.
@Override public void initialize(PersistenceInitializationContext context, WiredInitializerContext<TutorialInitializerMainContract> initializerContext, TutorialInitializerMainContract initializerMainContract) { CoreInstancesContract coreInstances = initializerMainContract.coreInstances(); TutorialInitializerModelsContract models = initializerMainContract.models(); coreInstances.cortexServiceModel().getDependencies().add(models.configuredTutorialApiModel()); addMetaDataToModels(initializerMainContract); } -
That's it! You can now build your group again. Execute
ant -Drange=.from your group folder to build all artifacts. You should now be able to execute REST calls we defined in Tribefire!